There are tons of different types of backpacks to use on backpacking trips, but they can mostly be broken down to 2 types: Internal Frame and External Frame.
The
EXTERNAL FRAME is the type we all had growing up, with the aluminum (or plastic) frame sticking above and below the storage part of the pack.
 |
| Typical External Frame Backpack (by Kelty) |
PRO'S:
- It's easy to strap a sleeping bag on the bottom and a tent on the top. Any size sleeping bag will fit and any size tent will fit. Then you stuff the rest of your stuff in the storage pockets.
- They've added a lot more padding than the one you and I used when we were young
CON'S:
- It's kind of like strapping a metal box to your back. It doesn't give, and it's stiff.
The
INTERNAL FRAME pack still has a frame, it's just on the inside of the pack instead of the outside.
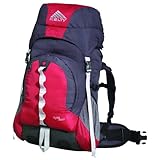 |
| Typical Internal Frame Backpack (by Kelty) |
PRO'S:
- Benefits to this design are that it hugs your body better, and should strap down better so it doesn't bounce, shift, etc. as much.
- It somewhat forces you to take less gear since everything fits inside the pack
- Some internal frame packs come with a zip-out rain cover. It's lightweight and easy to put on your pack for when you're hiking in the rain, or have to leave your pack outside in the rain because there isn't enough room inside your tent
CON'S:
- You have to buy an expensive, tiny mummy bag that fits inside the pack
- You have to buy an expensive, tiny tent that fits inside the pack (it is possible to strap some stuff to the pack, but it's not too easy)
- In keeping the pack from being too wide, some internal frame packs are quite deep (ie, they stick out behind you a long ways). This can be very tiring if your pack is constantly trying to tip you over backwards.
SIZE
So, what size is best to get? We've all been through the mentality of "I'll just get the biggest one I can get, and then I'll have plenty of room for whatever I need". But, if you do that, you will end up with the entire pack filled on each trip you go on - which makes for a heavy pack! Instead of buying the biggest one you can find, try a more moderate size, and then cut down on all the extra's that you probably won't need.
A good size for a scout (internal frame) would be in the range of 35,000 to 45,000 cubic inches (most packs are measured in cubic inches because with different shapes, an overall length, width, and height wouldn't show it's true packing capacity). I wouldn't go smaller than 35,000 ci, and if you get much bigger than 45,000 ci then you'll end up with all the shared equipment. If you are getting an external frame, go with 25,000 to 35,000 cubic inches.
For a leader, if you're like me, you may want to get as big as 55,000 cubic inches for an internal frame (I still bring a little extra of some things, just in case, and am young enough that my back can handle it). Or up to 40,000 for an external frame.
COMFORT
If you've spent some time backpacking 20 years ago, and see the packs available now, you've noticed that the new packs are much more cushy than the ones 20 years ago. The one I used as a scout had a hard, canvas belt that didn't stay tight (I was lucky, many of them from that time didn't even come with belts). Now the padding on the belt is thick enough to use as a pillow at night and the buckles actually stay tight! (I remember holding one hand on the buckle to keep it tight, and the other on the bottom of the pack to lift it and ease the rubbing on my shoulders and waist).
Shoulder straps are now better padded as well. In fact, some are curved to go around your neck so you don't get chafing there, and then strap together at your chest. These are pretty nice because you can use the strap to take the pressure off your shoulders. Anything that allows you to move the pressure to a different location is a good thing in my book. Undoubtedly, if you hike 10-15 miles in a day (or less even), you will get some rubbing on your shoulders and waist. If you can adjust that rubbing spot to keep it from getting too sore, your next day will go better.
EXTRAS
Some of the extras that I have found handy on backpacking trips are:
- Pockets built into the pack for a "camel back" type water container (bladder type). Some are built into the inside of the pack (which keeps the weight close to your body and makes it easier to carry), and some are in the form of a detachable day pack. I have found the day pack handy if you can fit more than just the bladder in it. Ideal is one that fits the bladder, some snacks or a small lunch, and a bit left over for a survival kit of some kind.
- Long pocket on the side of the pack that can store a fishing pole that comes apart into 3' segments or so. I've also used them for a folding saw. Or if you were splitting up a tent, you could put the tent poles in the pocket.
- I like the backpacks that open up from the front with a zipper. Some of them only open up on the top, and if you need something from the bottom you end up pulling everything out of the pack. With the front zipper, you can lay the pack down and have access to virtually anything in the pack with just one zip.
- I believe it's called a "daisy chain" that's on the back of some packs. It's basically a webbing that is sewn on the back with loops in it so you can clip things on it. I've found this helpful for clipping something to the back of the pack to dry out as you hike (some people only bring 1 pair of socks (plus what they wear) and wash their socks each day, then hang them to their pack while they hike to dry them out for the next day). Just don't strap a lantern or something heavy on there that will swing around and throw off your pace.
HINTS ON PACKING
When packing, try to keep your food above your stove in your pack. I always try to put the stove and fuel in the bottom of the pack. That way, if the stove or fuel bottle leaks, you won't ruin your food and starve on the trip.
External Frame:
Strap your sleeping bag onto the bottom of your pack, and your tent on the top. Sometimes you can roll your pad around your sleeping bag or tent and strap it to the pack together. Use straps such as those shown below so that you can cinch them up tight and keep them from bouncing around. I used to use bungy cords, but it's hard to get one just the right size to keep it from bouncing as you walk.
 Internal Frame:
- Roll up your mummy bag tight and stuff it inside the bottom zippered pocket on your pack. The tent may need to be taken out of the bag so that you can put the long poles in the upper pocket and the tent and fly as well. Sometimes you can strap the tent to the top of the pack, or vertically on the back of the pack (but this will move the center of weight further behind you, making you constantly fight to stay upright)
BACK TO BACKPACKING OVERNIGHTER


